If you’re looking for a versatile tool that can help you create beautiful wood carvings, a rotary tool is a perfect option. Rotary tools are incredibly powerful and can be used for a variety of tasks, including sanding, cutting, and carving. In this blog post, we will discuss the basics of using a rotary tool for wood carving and provide some useful tips and tricks to help you get started. Let’s get started!
What Is A Rotary Tool?
A rotary tool is a handheld power tool that uses a rotating bit to perform various tasks, such as sanding, drilling, and carving. Rotary tools are very versatile and can be used for a variety of different projects.
What Is Rotary Tool Used For?
Rotary tools can be used for a variety of tasks, including:
- Sanding
- Drilling
- Cutting
- Carving
Rotary tools are very versatile and can be used for a variety of different projects. If you’re looking for a tool that can help you with your wood carving project, a rotary tool is a perfect option.
How to Use a Rotary Tool for Wood Carving
When using a rotary tool for wood carving, it is important to use the correct bit. There are many different types of bits available, so be sure to choose one that is designed for wood carving. It is also important to use the correct speed setting on your rotary tool. Start with a lower speed and gradually increase the speed as needed.
One of the most important things to remember when using a rotary tool is to keep it moving. If you allow the bit to stay in one spot for too long, it will overheat and damage the wood.
The Types Of Rotary Tools For Wood Carving
There are a variety of rotary tools on the market, and it can be tough to decide which one is right for you. When choosing a rotary tool for wood carving, you’ll want to consider the power of the tool, as well as its speed and torque settings.
The Dremel
The most common type of rotary tool is the Dremel. Dremel rotary tools are incredibly powerful and come with a variety of attachments that can be used for a variety of tasks. If you’re looking for a tool that can do it all, a Dremel is a great option.
The Foredom
Another popular type of rotary tool is the Foredom. Foredom tools are designed specifically for carving and come with a variety of attachments that are perfect for woodcarving. They are also very powerful and can handle a variety of tasks.
The Kutzell
If you’re looking for a more affordable option, the Kutzell is a great choice. This rotary tool is less powerful than the Dremel and Foredom, but it still has enough power to handle most carving tasks. It’s also very affordable, making it a great option for beginners.
What We Can Do With A Rotary Tool?
There are several uses for the rotary tool for wood carving projects. We can use it for cutting, roughing, shaping, sanding, and more. It is a versatile tool that can be used for many different applications.
Cutting
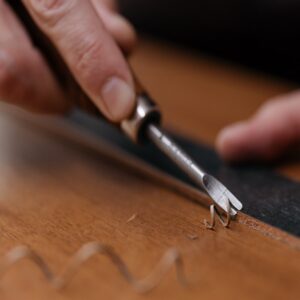
There are a few different ways that you can use a rotary tool to cut into the wood. One way is to use the cutting bit to create a groove. To do this, hold the tool at an angle and slowly move it down the length of the wood. You can also use the cutting bit to create a hole. To do this, hold the tool perpendicular to the wood and slowly move it down.
Roughing
With the rotary toolset to its lowest speed, use a carving burr to rough out the basic shape of your design. Hold the tool at a slight angle and make sure you keep the cutting edge in contact with the wood at all times. Take your time and go slowly, especially around curves and corners.
Shaping
Once the roughing is done, switch to a sanding drum with a finer grit and go over the entire surface of the carving. This will give it a more polished look.
Finishing
To finish off your carving, use a buffing wheel to apply some polish and give it a shine. You can also use a brush to apply a sealant if you want to protect the wood from moisture and fading.
The Speed Control
One of the most important features of a rotary tool for wood carving is speed control. Good speed control will allow you to adjust the speed of the tool depending on the task at hand. This is especially important when carving, as you’ll want to be able to adjust the speed depending on the type of wood you’re working with.
The Torque Control
Another important feature to look for in a rotary tool for wood carving is the torque control. This will allow you to adjust the power of the tool, which is important when working with harder woods.
The Attachments
When choosing a rotary tool for wood carving, be sure to consider the available attachments. There are a variety of attachments available, including sanding discs, cutting blades, and carving bits. It’s important to choose the right attachment for the task at hand, so be sure to do your research before making a purchase.
Safety First
Always wear safety goggles when using a rotary tool. The spinning blades can cause serious injury if they come into contact with your eyes. Wearing gloves is also a good idea, as is keeping the work area well-ventilated.
Start Slow
When starting, it’s important to start slow. Don’t try to do too much at once. Start with some basic cuts and work your way up.
Use The Correct Bit
When carving, be sure to use the correct bit for the job. A carving bit is designed specifically for carving, while a cutting blade is designed for cutting. Using the wrong bit can cause damage to the tool and/or the wood.
The Right Wood
When carving, it’s important to use the right type of wood. Harder woods are more difficult to carve and require more power from the tool. Softer woods are easier to carve, but they also tend to wear down a bit faster.
The Right Technique
There is no one-size-fits-all technique when it comes to wood carving. You’ll need to experiment and find what works best for you. However, there are a few basic techniques that everyone should start with:
The Pointy End
When starting out, it’s best to use the pointy end of the bit. This will allow you to make precise cuts and get started on your project quickly.
The Cutting Edge
Once you’ve gotten comfortable with the pointy end, move on to the cutting edge. This will allow you to make deeper cuts and create more detailed carvings.
The Flat End
When you’re finished carving, use the flat end of the bit to smooth out your work. This will remove any rough edges and give your project a polished look.
Can I Use Rotary Tool For Sanding?
Yes, you can use a rotary tool for sanding. Just be sure to use the correct attachment and adjust the speed accordingly. Sanding too quickly can damage the wood, so it’s important to go slowly and be careful.
How Do You Cut Straight Lines With A Rotary Tool?
To cut straight lines with a rotary tool, you’ll need to use the cutting blade attachment. Be sure to adjust the speed and power accordingly, as cutting too quickly can damage the wood. It’s also important to keep the blade perpendicular to the wood, as this will help ensure a straight cut.
When carving, always start with the pointy end of the bit. This will allow you to make precise cuts and get started on your project quickly. You can then move on to the cutting edge once you’ve gotten comfortable with the pointy end, which will allow you to make deeper cuts and create more detailed carvings. Finally, use the flat end of the bit to smooth out your work and remove any rough edges.
Conclusion
Wood carving is a popular hobby and a great way to create unique pieces of art. A rotary tool can be a valuable addition to your wood carving arsenal, providing you with the ability to quickly and easily remove large amounts of material. With a little practice, you can use a rotary tool to create beautiful carvings that will amaze your friends and family.